
The Project Page!
- Make a projectile motion animation
- Step 1: With gravity and no friction
- Step 2: Add variable friction
To open the spreadsheet for your starting point, click here.
Notice that the spreadsheet is written on two "sheets" which are labeled "The Interface" and "The Brains." To do this project, YOU ONLY NEED TO EDIT THE SHEET LABELED "THE BRAINS." If you really want to, you may ADD features to the Interface but you may not take features away. Adding features to the Interface would probably add to the complexity of the project so it is not recommended.On the Interface sheet, you will see a graph and all of the controls that you will need to control it. The animation comes with one control button ("Launch!" which is pretty obvious) and five scrollbars to control the dynamics.
- The controls on scrollbars are:
- Aim (changes the initial direction of the ball)
- Initial velocity (changes the initial speed of the ball)
- Mass (changes the mass of the ball - is this important?)
- Friction (changes the "coefficient of friction" - see below)
- Animation speed (notice that increasing the speed of the animation automatically decreases the accuracy of the simulation, and vice versa)
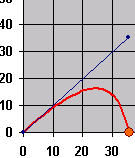
As it stands the graph just shows the trajectory of a ball shot into the air in the absence of both gravity and friction. The ball just moves in a straight line (not very interesting).
STEP 1 of the project is to add gravity. On the "Brains" sheet, adjust the columns for velocity, acceleration, and force however you need to in order to make the ball move with an appropriate trajectory.
- You may NOT enter an equation of motion into the "x" and "y" cells of the Brains sheet. You should not edit the "x" and "y" cells of the Brains sheet at all. The "x" and "y" cells are graphed on the Interface page and they are written correctly.
- The "x" and "y" columns are calculated from the velocity columns, so your job is to edit the velocity columns (and any columns to the right of velocity) to make the animation run properly.
The method of calculation for this project is the Euler method of differential equations which simply assumes that if the time interval is short enough, it will be reasonably accurate to approximate motion during that time interval as motion with a constant velocity. You are to adjust the velocity column to take acceleration into account. If you do so correctly, the trajectory will be accurate enough.
- The Euler method calculates a new position ( xi+1 )
from an old position ( xi ) using the formula:
xi+1 = xi + vi * Delta t .
This is only exact if velocity is constant but it is pretty accurate if Delta t is small enough. - You should edit the velocity column so that the spreadsheet calculates
new velocities ( vi+1 ) from old velocities ( vi
) using the formula:
vi+1 = vi + ai * Delta t .
This formula is only exact if acceleration is constant but it will be accurate enough for our purposes if Delta t is small . - NOTE: The interface estimates the "time of flight" using the value 9.8 m/s2 for "g". You will still get acceptable results if you use another value (such as 10 m/s2) but things might run a little more smoothly if you use 9.8 m/s2.
STEP 1 is to get the spreadsheet working so that it accurately models projectile motion in the absence of air resistance. You are to use only the Euler approximation as explained above. Do NOT type an an equation of motion of the form:
- x = x0 + v0 * t + (1/2) * a * t2 .
Once you have completed STEP 1, save your spreadsheet with a name that includes your name at the start (such as SamSmithProjectPart1.xls) and turn it in my emailing it to me (kclay@greenriver.edu).
STEP 2 of the project is to modify the spreadsheet so that it includes air resistance. Our model of air resistance for this part will be that the force of friction due to air resistance is proportional to the velocity of the object but points in a direction opposite the velocity. We will call the proportionality constant "b" (or "frictionB" in the spreadsheet). In other words:
- In the horizontal direction: fx = - b * vx
- In the vertical direction: fy = - b * vy
To complete STEP 2 you will need to calculate the net force on the projectile. Notice that on the Brains page there are columns for acceleration, weight, friction, and net force (each with an x and y component).
Also notice that the controls on the Interface page define variables called "mass" and "frictionB" which you can use in your formulas. You can write " = W5*mass " in some cell the result will be the contents of cell W5 multiplied by "mass" as defined on the Interface page (and this cell will automatically adjust when the value of mass is adjusted with that scroll bar). You can do the essentially the same thing with friction, multiplying the contents of cell Z3 by the "b" in the friction equations by writing " = Z3*frictionB " (you do not need to calculate "frictionB" since it will automatically be assigned a value by a scroll bar on the interface page).
When you complete STEP 2 you should have an animation that adjusts to changes that the user makes to the coefficient of friction ("frictionB") and the mass ("mass"). You should be able to launch the projectile with no friction and with lots of friction and clearly see the difference. You can think about the difference (if any) that adjusting the mass will make.
Again, to complete STEP 2, you are to use only Euler's method. Position adjusts itself based only on the previous position and the previous velocity. Velocity adjusts based only on previous velocity and acceleration. Acceleration is determined from Newton's second law.
Once you have completed STEP 2, save your spreadsheet with a name that includes your name at the start (such as SamSmithProjectPart2.xls) and turn it in my emailing it to me (kclay@greenriver.edu).
STEP 3 is completely optional. STEP 3 will be to improve upon the Euler method without assuming that you know the solution (which you do know in the absence of friction). In other words, how could the spreadsheet for STEP 2 be "tweaked" so that Excel still solves for the dynamics but it does so in a way that is more accurate and not too much slower than Euler's method.
You can get an idea of the accuracy of your method by looking at whether the landing point changes when you make the animation faster or slower. How slow do you have to go in order to make the predictions independent of further reductions in speed? With the Euler method you will be able to see the landing point change as the speed is reduced. For STEP 3 you might be able to come up with a method where these changes are small or maybe even nonexistent.
For STEP 3 you should not calculate an equation for position as a function of time that you type into some cell. You can only use simple adjustments of what you did in STEP 2 to make Excel a little "smarter" in the way it calculates things.
Once you have completed STEP 3, save your spreadsheet with a name that includes your name at the start (such as SamSmithProjectPart3.xls) and turn it in my emailing it to me (kclay@greenriver.edu).
You may not simply copy the spreadsheet of one of your classmates! This kind of copying leaves traces that can usually be found. If two students are found to turn in spreadsheets that are copies, then both projects will be awarded a grade of zero.
-
Want to learn more about how to make Excel animations?
Click here. - Animations won't run? Click here for help.
![]()